
Hotwire Native: In-app Purchases on iOS
The full flow from HTML paywall to real-time success message, and how a single UUID is all it takes to tie it together.

If you’re selling digital content or subscriptions in your iOS app, Apple requires you to use in-app purchases. No way around it. And for Rails developers, this is one of the trickiest features to build: you need native Swift code to talk to StoreKit, webhook handlers to process Apple’s notifications, and a way to sync it all back to your server.
Side note: If you’re selling to US or EU customers, Apple now allows linking to external payment providers like Stripe. But they show a scary warning screen that tanks conversion. For most apps, native IAPs are still the better path.
This article walks through the full flow: triggering a purchase from your HTML paywall, handling it in Swift, processing Apple’s webhooks, and updating the UI in real-time with Turbo Streams. I’ve built this for a bunch of clients over the past 10+ years, and the approach here is exactly how PurchaseKit works under the hood.
The in-app purchase flow
Here’s what we’re building:
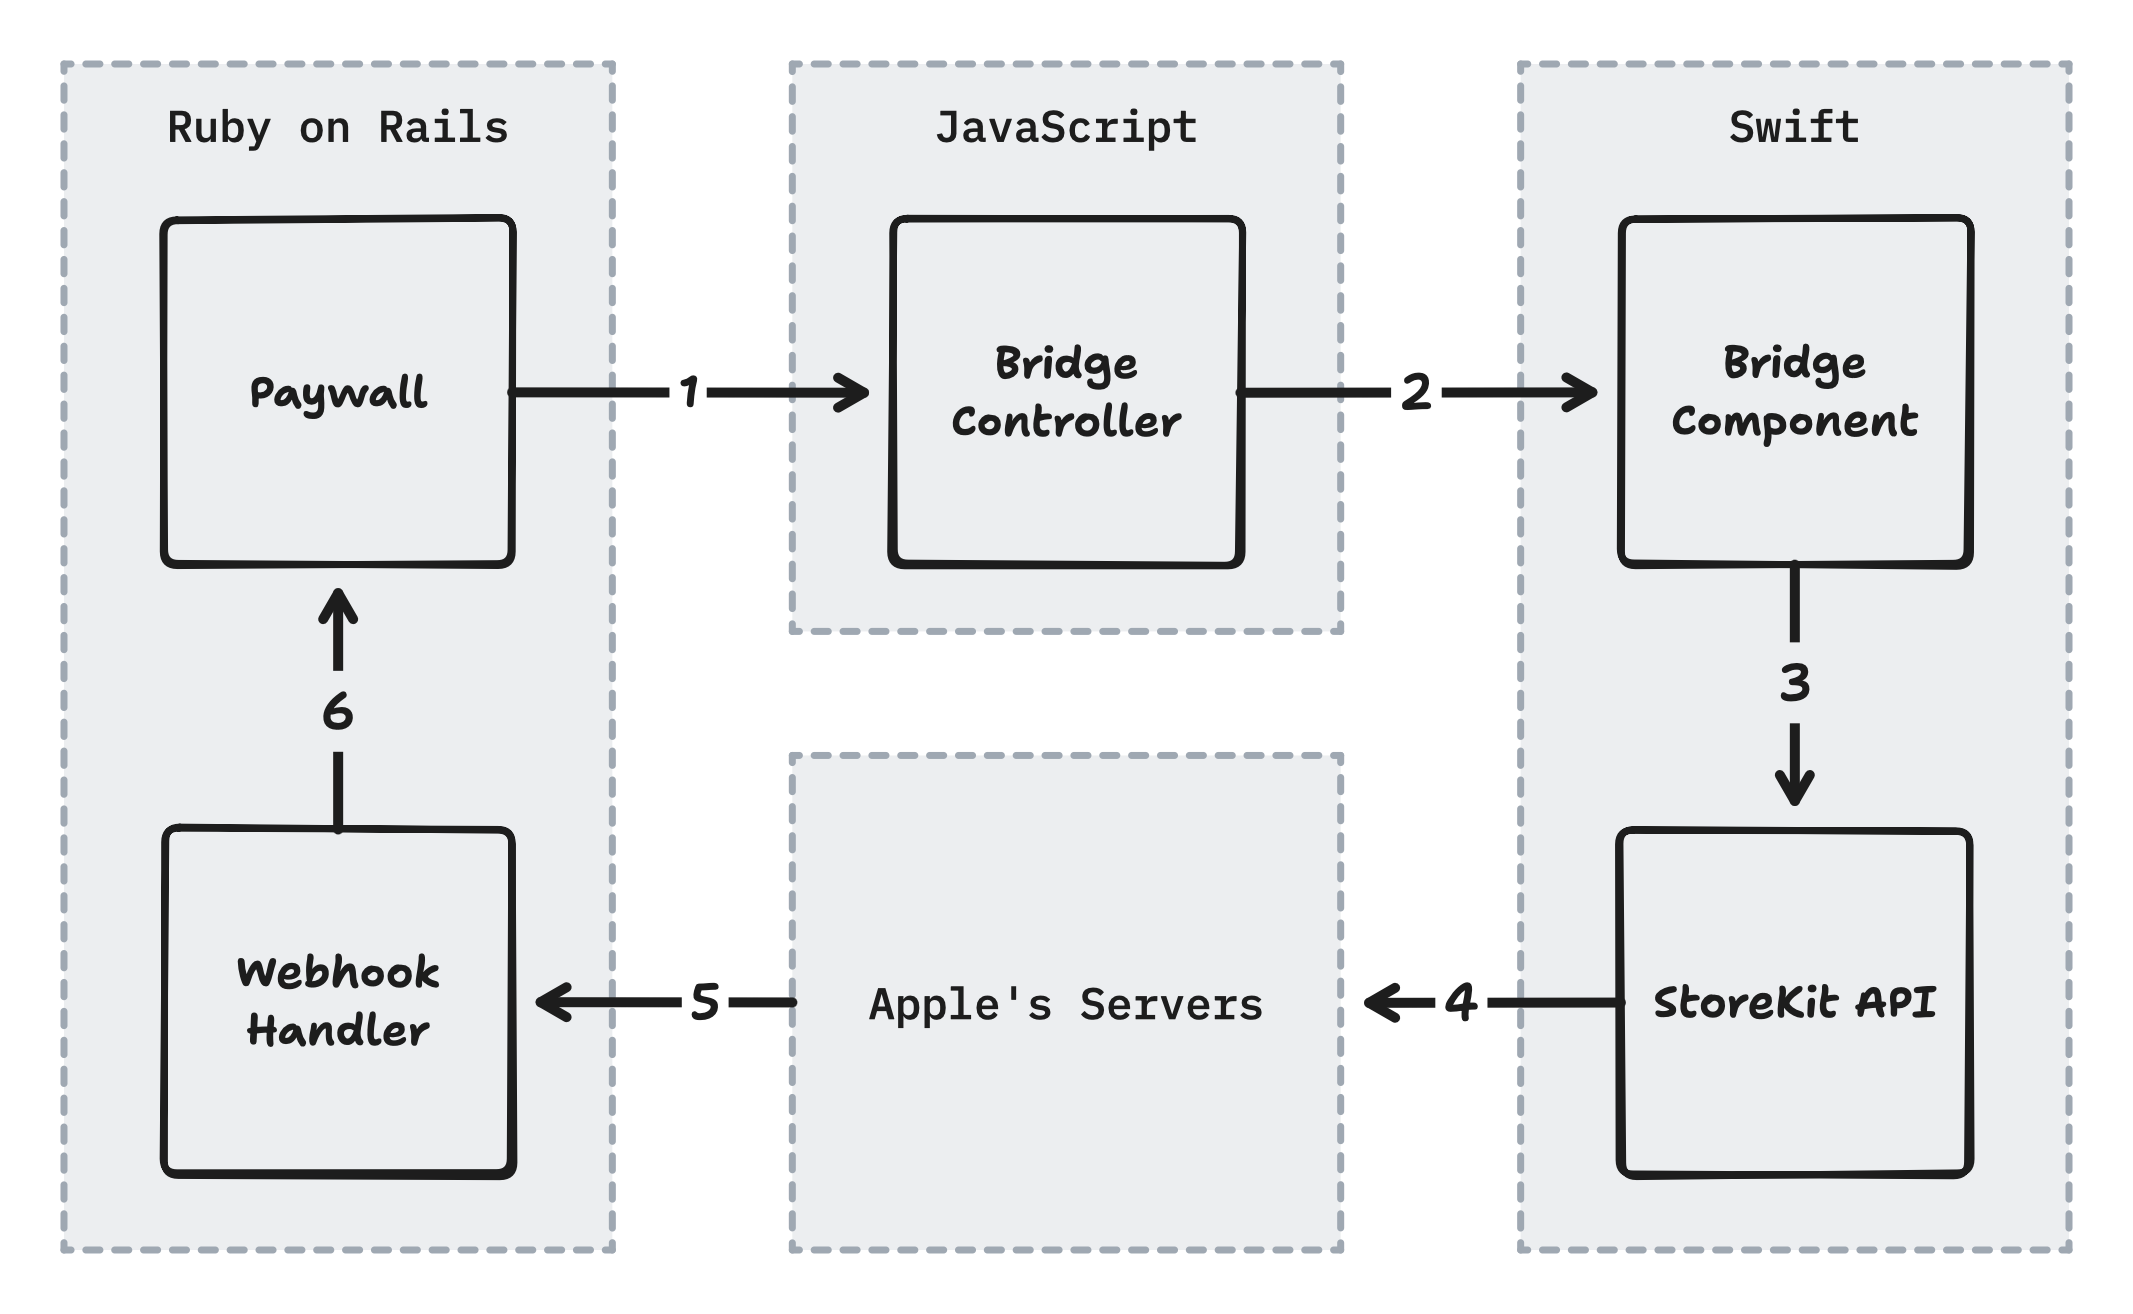
A heads up that these code examples are abbreviated to fit. Reference the downloadable source code below for the full implementation.
1. Trigger the purchase from HTML
A button fires a Stimulus controller, passing the product ID and a token to identify the user from the HTML.
<div data-controller="bridge--paywall">
  <button
      data-action="bridge--paywall#subscribe"
      data-product-id="com.example.pro.annual"
      data-user-id="<%= Current.user.id %>">
    Subscribe for $4.99 per month
  </button>
</div>
2. Send the request to native
The bridge controller extracts the data and sends it to the iOS bridge component.
export default class extends BridgeComponent {
static component = "paywall"
subscribe(event) {
const productId = event.currentTarget.dataset.productId
const userId = event.currentTarget.dataset.userId
this.send(”purchase”, { productId, userId })
}
}3. Call StoreKit
iOS receives the message, fetches the product from StoreKit, and initiates the purchase with the user’s identifier.
class PaywallComponent: BridgeComponent {
override class var name: String { "paywall" }
override func onReceive(message: Message) {
let id = message.data["productId"]
let userId = message.data["userId"]
let product = Product.products(for: [id]).first!
product.purchase(options: [.appAccountToken(userId)])
}
}4. Handle Apple’s webhook
After a successful purchase, Apple POSTs a signed JSON Web Signature (JWS) to your Rails server. This is decoded to find the user via the identifier and their subscription is updated.
class AppStoreWebhooksController < ApplicationController
def create
payload = decode(params["signedPayload"])
info = decode(payload["data"]["signedTransactionInfo"])
user = User.find(info["appAccountToken"])
case payload["notificationType"]
when "SUBSCRIBED"
user.subscription.update!(
product_id: info["productId"],
expires_at: Time.at(info[”expiresDate”] / 1000),
status: :active
)
end
head :ok
end
end5. Broadcast the update
When the subscription saves, a Turbo Stream is broadcasted to replace the paywall with a success message.
class Subscription < ApplicationRecord
belongs_to :user
after_commit :broadcast_update, if: :active?
def broadcast_update
Turbo::StreamsChannel.broadcast_replace_to(
user, :paywall,
target: "paywall",
partial: "paywalls/success"
)
end
endThe key insight is the appAccountToken. When iOS makes a purchase, it can pass a UUID that Apple will echo back in every webhook related to that transaction. We use this to correlate purchases to users: embed the user’s ID in the token, and when Apple’s webhook arrives, extract it to know who just subscribed.
Which means there’s no session cookies, callback URLs, or “pending purchase” records to clean up.
The product ID (like com.yourapp.pro.monthly) is how you identify what’s being purchased. You’ll hardcode these in your HTML buttons and receive them back in webhooks.
This approach has a bunch of benefits.
You can design and iterate on your paywall in Rails. And that means you can run pricing experiments or complete redesigns without having to submit new binaries to the App Store.
Subscription data lives in your Rails database, not on Apple’s servers. That means you can use your usual
user.subscribed?instead of having to do a round-trip to the device.Listening for webhooks ensures that your subscription data is always kept in sync, even if the user never opens the app again. This is super helpful when someone subscribes in the app - you’ll want to give them access on web, too.
If this looks like a lot of moving pieces, well… you’re right. PurchaseKit handles all of this (plus Android, error handling, and edge cases) so you can skip the complexity. But if you want to understand how it works under the hood, or build it yourself, read on.
Paid subscribers get the complete implementation: every line of Swift, JavaScript, and Ruby explained step-by-step, plus a downloadable demo app with working StoreKit code you can run on your device today.
