
Hotwire Native: Push Notifications
Native push notifications are tricky because there's a ton of moving pieces to get right. Here's my step-by-step process to get them working in your Hotwire Native apps.

One of the biggest selling points of a mobile app is push notifications.
Sometimes, it’s the reason my clients need an app over a website. This is because push notifications are instant and drive higher engagement than email or SMS. And even with recent enhancements to Progressive Web Apps (PWAs), native apps are still the best way to send reliable, timely notifications.
Sadly, implementing push notifications isn’t exactly straightforward. There are a ton of pieces and everything has to line up perfectly for them to work. And that’s before we even get to Hotwire Native-specific code!
The good news is that you’re in good hands. I’ve added push notifications to dozens of Hotwire Native apps over the past decade. I’ve watched as the requirements shift and tweaked my process to accommodate. What follows is the most succinct way to send push notifications your iOS and Android apps powered by Hotwire Native.
Before we dive into code, let’s cover the different actors at play.
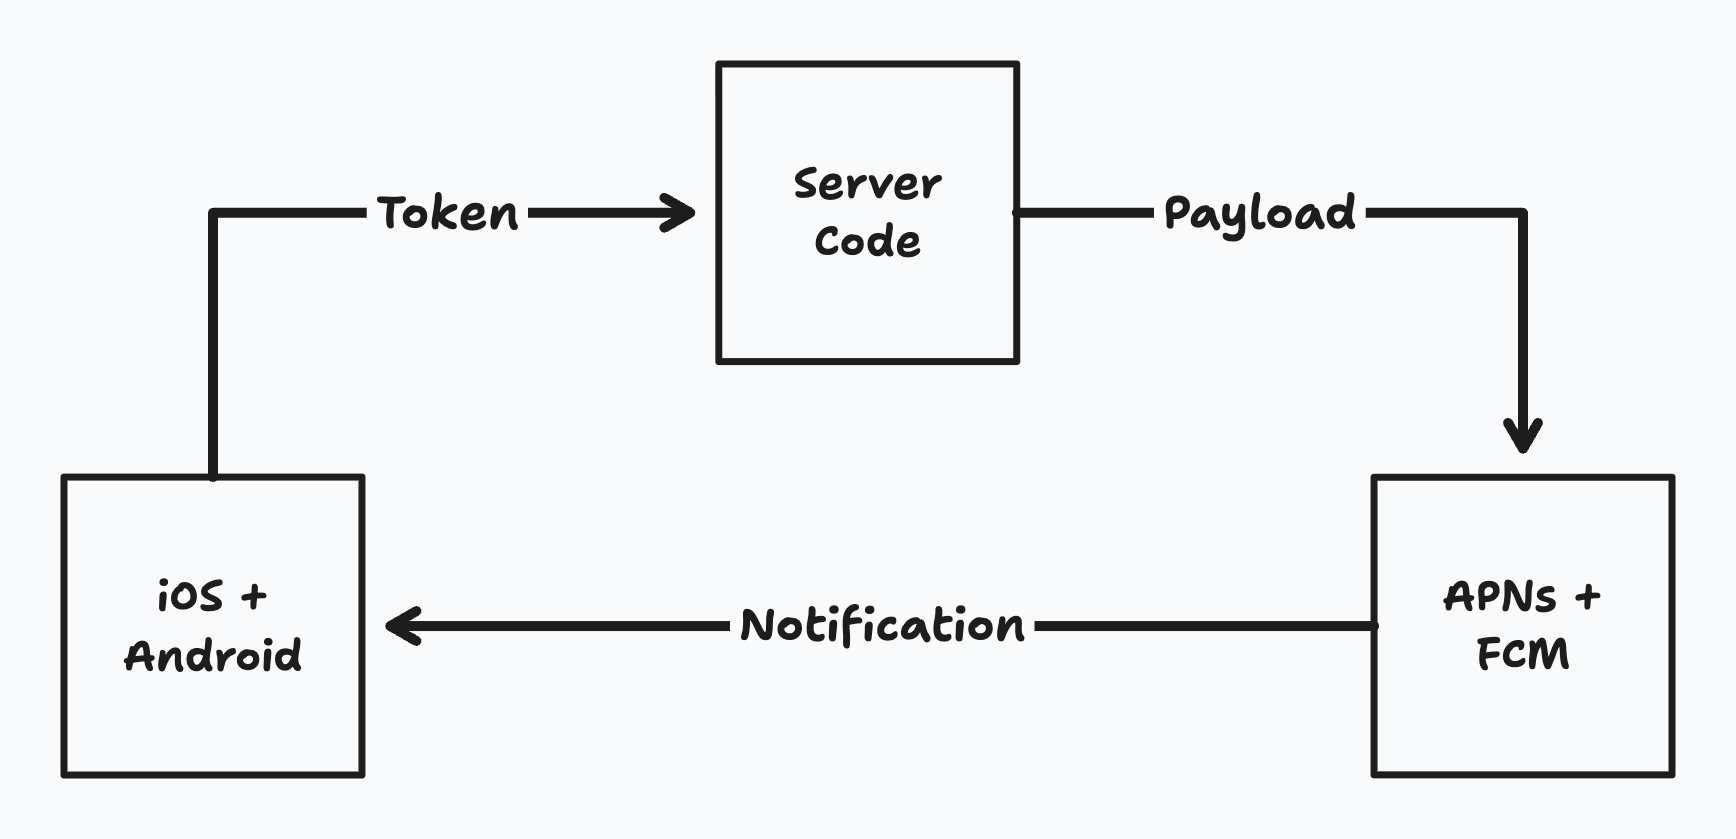
Push notifications via APNs and FCM
Push notifications are sent to iOS devices via Apple Push Notifications service (APNs) and to Android devices via Firebase Cloud Messaging (FCM). They are triggered by POSTing a JSON payload to these services. Determining which users receive those notifications is handled by device-specific notification tokens.
The flow works like this:
The device provides a unique notification token and sends it to the server.
The backend server sends a payload to APNs/Firebase with the token.
The device receives the push notification from APNs/FCM.
For Hotwire Native, I often implement something exactly like this:
Register the device for push notifications via a bridge component:
class NotificationTokenComponent: BridgeComponent {
    class var name: String { "notification-token" }

    override func onReceive(message: Message) {
        let center = UNUserNotificationCenter.current()
        let options: UNAuthorizationOptions = [.alert, .sound, .badge]
        try await center.requestAuthorization(options: options)
        UIApplication.shared.registerForRemoteNotifications()
    }
}POSTthe token via an API client to the server:
func register(_ token: String) async throws {
    let url = rootURL.appending(path: “notification_tokens.json”)
    var req = URLRequest(url: url)

    req.httpMethod = "POST"
    req.addValue("application/json", forHeader: "Content-Type")

    let notificationToken = NotificationToken(token: token)
    req.httpBody = try JSONEncoder().encode(notificationToken)

    try await URLSession.shared.data(for: req)
}
Persist the token via Action Push Native in a new JSON endpoint:
class NotificationTokensController < ApplicationController
  def create
    ApplicationPushDevice.find_or_create_by!(
      token: params[:token],
      owner: Current.user
    )
    head :ok
  end
end
Send a notification to APNs/FCM:
ApplicationPushNotification.new(title: “A new notification!”)
  .deliver_later_to(Current.user.application_push_devices)
Want the exact approach? The paid section includes:
The exact 4-step approach I follow to get everything working
A checklist to help you spend less time debugging
The full source code for Rails, iOS, and Android apps
That’s all below.
